Physics Simulations in Bevy
Bevy is the most popular and powerful game engine in Rust. Because of its flexibility, it can be used not only for games but also for (scientific) physics simulations.
In this blog post, I will share my experience using Bevy for physics simulations from scratch as part of my master's thesis supervised by Prof. Elmar Schömer.
Note
This blog post is the base for my talk at Scientific Computing in Rust 2024. You can watch the recorded talk on YouTube ⏯️
Landscape mode recommended on mobile devices
Contents
Learning Resources
In this section, I will talk about the resources that helped me get into Bevy.
Bevy offers an official Quick Start Guide that gets you started with a simple program and briefly explains the most important concepts in Bevy. But it is too short! At its end, you get to the Next Steps page which shows you some links. In my opinion, the most important link is the one to the unofficial Bevy Cheat Book by Ida (@inodentry). This cheat book is very helpful; the missing piece of high level documentation 📚️
After getting familiar with the basics, you can check out the official examples. They are well documented and you can even run them in your browser.
Of course, there is also the API documentation on docs.rs/bevy.
There are some good tutorials on YouTube. Chris Biscardi has some wonderful videos about Bevy. He also offers This Week in Bevy, a weekly overview of what is new in Bevy and its ecosystem. Zymartu Games also has some helpful videos for beginners.
Because Bevy is still under heavy development, third-party learning resources get partially outdated after some releases. This might not be a huge deal for people using Bevy long enough to know how to adapt to the latest version. But it is a problem for beginners who just want to follow a tutorial without checking the migration guides of the latest versions.
It is only a matter of time until Bevy gets more stable and the set of learning resources improves. Until then, use the resources I mentioned and don't hesitate to ask the Bevy community when you need help. The community is lovely 🤗
Solver
Although there are physics engines for Bevy, I implemented the solver from scratch to get a deeper understanding of how it works. Using a "black box" isn't the goal of my thesis.
The solver that I implemented is based on this paper about Extended Position Based Dynamics (XPBD) for rigid bodies.
Luckily, I found these XPBD tutorials in Rust by Johan Helsing. Although they aren't done yet, they are very well written and I highly recommend following them if you are interested in implementing physics from scratch in Bevy. They helped me with the initial code design and were the perfect step-by-step guide to get started with XPBD.
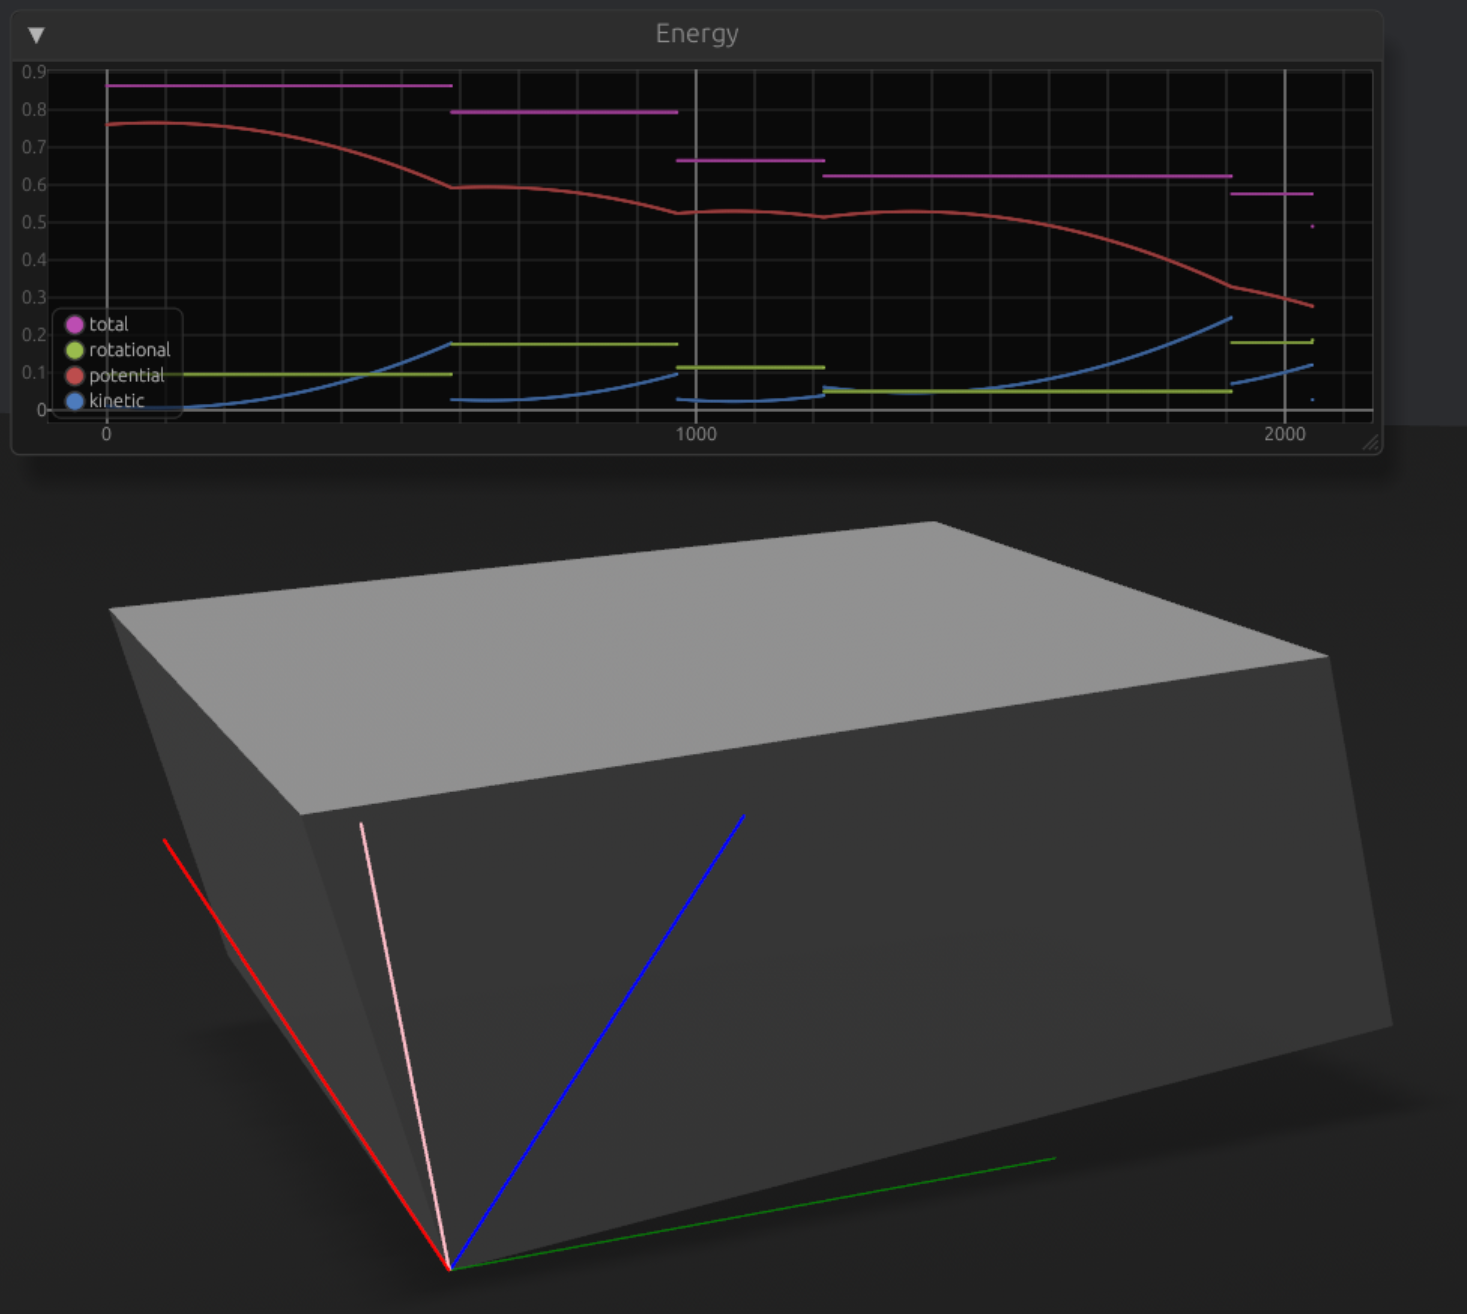
My general tip for implementing physics from scratch is to start simple and gradually increase the complexity. A good first step is to simulate a sphere bouncing on the ground without friction. Plot the energy over time and make sure that the total energy is conserved (slow decay is normal due to numerical errors). Then, move on to a box bouncing on the ground to also consider rotation. Don't make my mistake of trying to implement the whole simulation method at once and directly trying to simulate the interaction between two complex objects 😅
Debugging
At some point, I was stuck on a bug with the implementation of friction. Trust me, debugging floats isn't fun! Gizmos are essential for visual debugging. I highly recommend adding them to the debug builds of your games or simulations.
Another very helpful tool for visual debugging is system stepping.
It is a rather new feature in Bevy that was introduced in version 0.13.
It allows you to control the execution of some systems (e.g. physics logic) at runtime.
Take a look at this function that I use to handle stepping:
// Ignore the signature if you aren't familiar with Bevy.
fn stepping_handler(mut stepping: ResMut<Stepping>, input: Res<ButtonInput<KeyCode>>) {
    if input.just_pressed(KeyCode::Digit1) || input.pressed(KeyCode::Digit2) {
        // Pressing 1 runs the systems for one frame.
        // Holding 2 runs the systems until the key is released.
        stepping.continue_frame();
    } else if input.just_pressed(KeyCode::Digit3) {
        // Pressing 3 disables stepping which means that the systems run freely.
        stepping.disable();
    } else if input.just_pressed(KeyCode::Digit4) {
        // Pressing 4 enables stepping again.
        stepping.enable();
    }
}
In combination with gizmos, I start my simulation, run it for some frames until something interesting happens like a collision and then go frame-by-frame to check all vectors, collision points etc.
You might ask, why not use a debugger with break points instead?
The advantage of system stepping is that it only affects the logic that you enable it on, grouped in something called schedule. Everything else outside of the targeted schedule continues to run normally. This avoids freezing and allows you to navigate with your camera if the camera navigation logic is in another schedule. So you can rotate around and zoom into the object that you are inspecting 🔍️
Comparing with the XPBD implementation in the bevy_xpbd crate by Joona Aalto also helped a lot while debugging my implementation.
The crate is now renamed to Avian with a new solver called TGS Soft that I want to try and compare with.
This is also the solver used by Rapier, another physics engine in Rust.
Ecosystem
There are many crates extending the functionality of Bevy and it is pretty easy to integrate them. Nevertheless, I tried to keep the amount of dependencies at a minimum to learn more by implementing what I need. I also didn't want to wait on one more dependency to add support for the latest Bevy release before I am able to migrate (see migrations section later on).
I used the following Bevy plugin crates:
bevy_eguiwhich is an integration of egui into Bevy. Perfect for live plots of a real-time simulation.bevy_trackballfor camera navigation. It can even handle touch events!bevy_mod_pickingfor picking meshes and handling dragging them. This crate is planned to be upstreamed so it should be part of Bevy soon.
ECS
When you use crates in the Bevy ecosystem or even write your own plugins, you feel some kind of magic! To give you an impression, we need to briefly talk about Bevy's design around ECS: Entity Component System.
For a simplified explanation, let's take a ball bouncing on the ground as an example:
- Entities are the objects in the simulated world like the ball. These can have multiple components.
- Components are data structures that characterize an entity. For example, the ball can have the components
Position,VelocityandMass. - Systems are Rust functions that can query components and modify them (similar to a database query).
Components are normal Rust structs.
For example, the position can be just a wrapper around DVec3 (a 3-dimensional f64 vector):
#[derive(Component)]
struct Position(DVec3);
An example for a system would be a function that integrates the linear velocity and position. This function works on every entity that contains the components position, velocity and mass:
fn integrate(mut q: Query<&mut Position, &mut Velocity, &Mass>) {
    for (mut r, mut v, m) in &mut q {
        // …
    }
}
You can define such systems to plot the potential, kinetic and rotational energies of the simulation.
Then, you collect the plotting logic in a Plugin.
Now, if you start with a new simulation and want to plot the energy, it is a matter of adding one line that adds the plotting plugin!
Everything works as expected for every simulation as long as each simulation uses the same components.
Take a look at the following Git commit. It imports and adds egui and my energy plotting plugin to a new simulation:
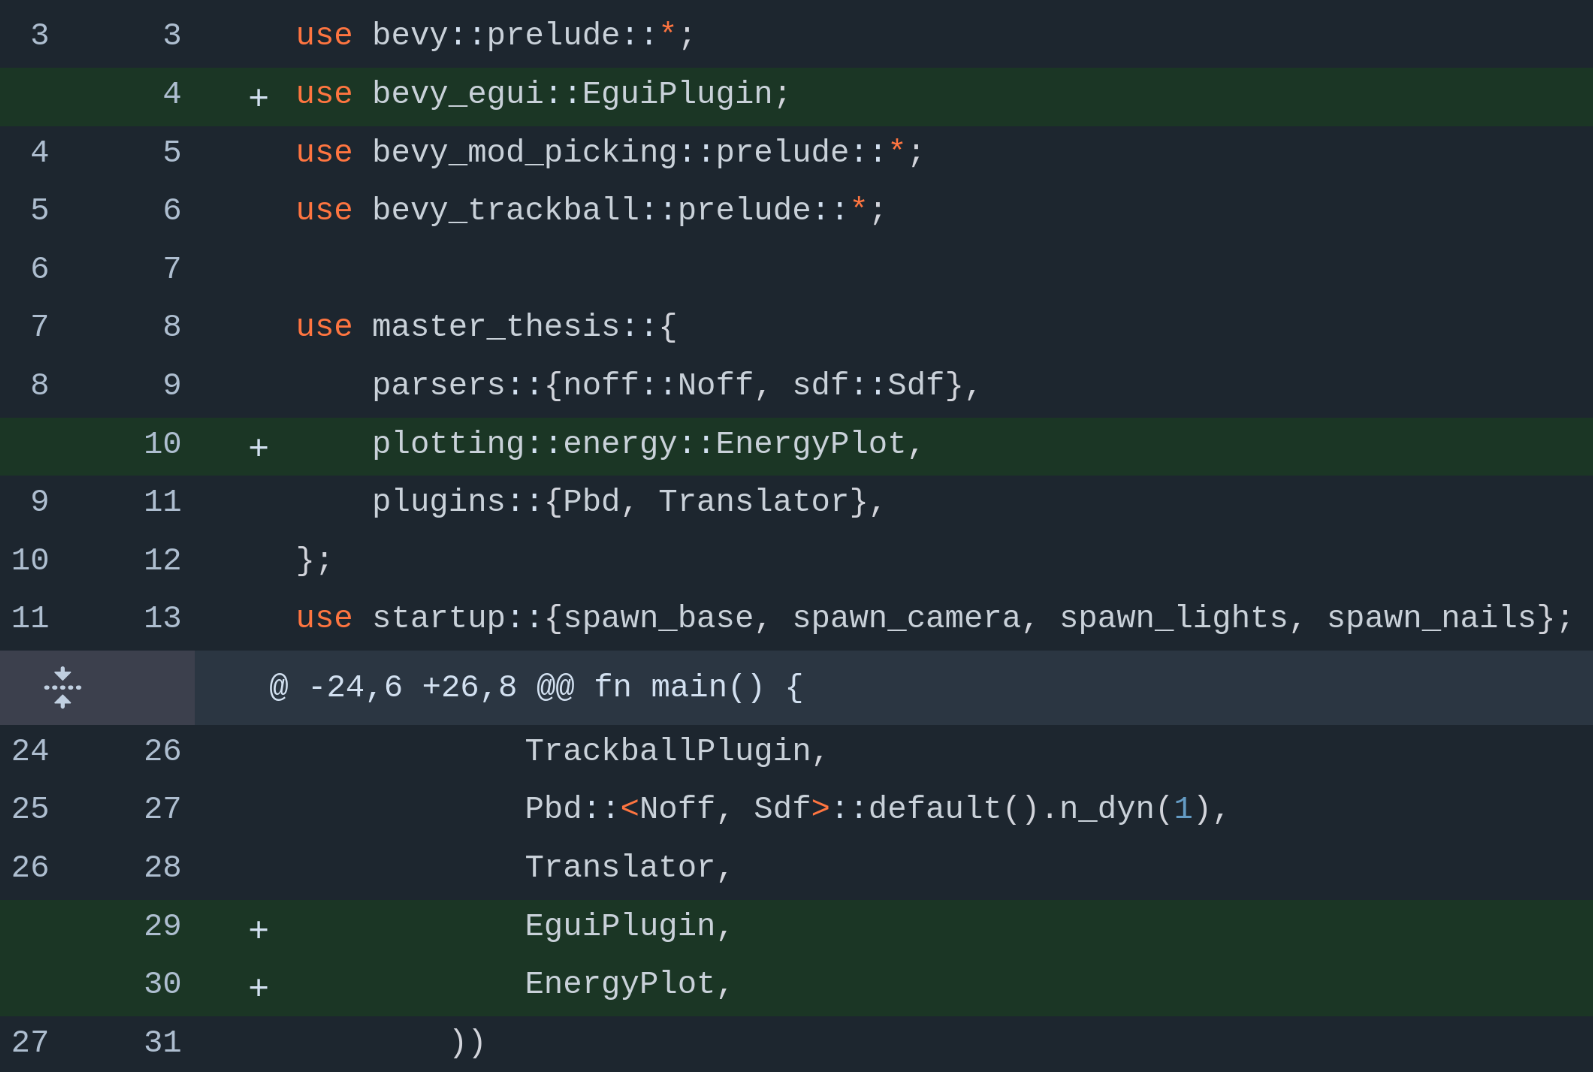
Yes, it is just a change of 4 lines to add that energy plot to new simulations 🤯
Simulations
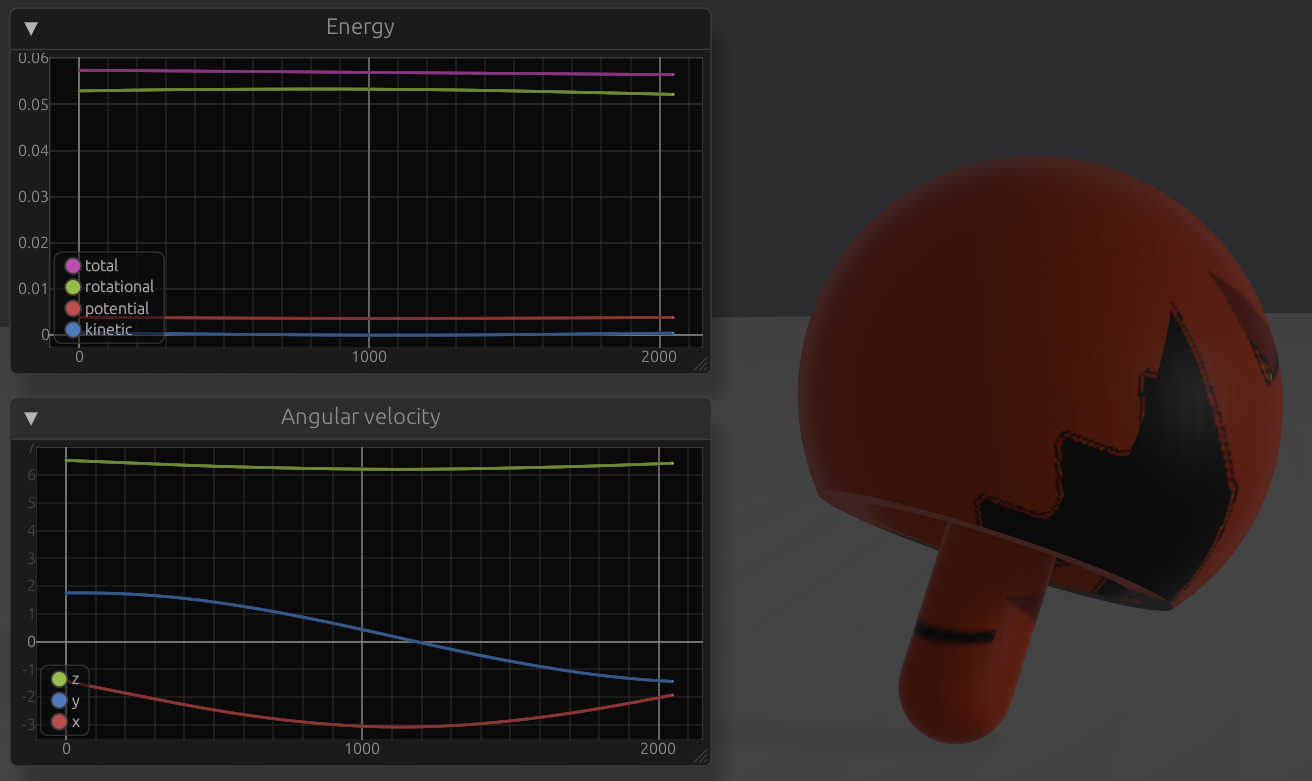
The most important simulations that I made are Rattleback and Tippe Top.
Rattleback (check out the Wikipedia article and its video):
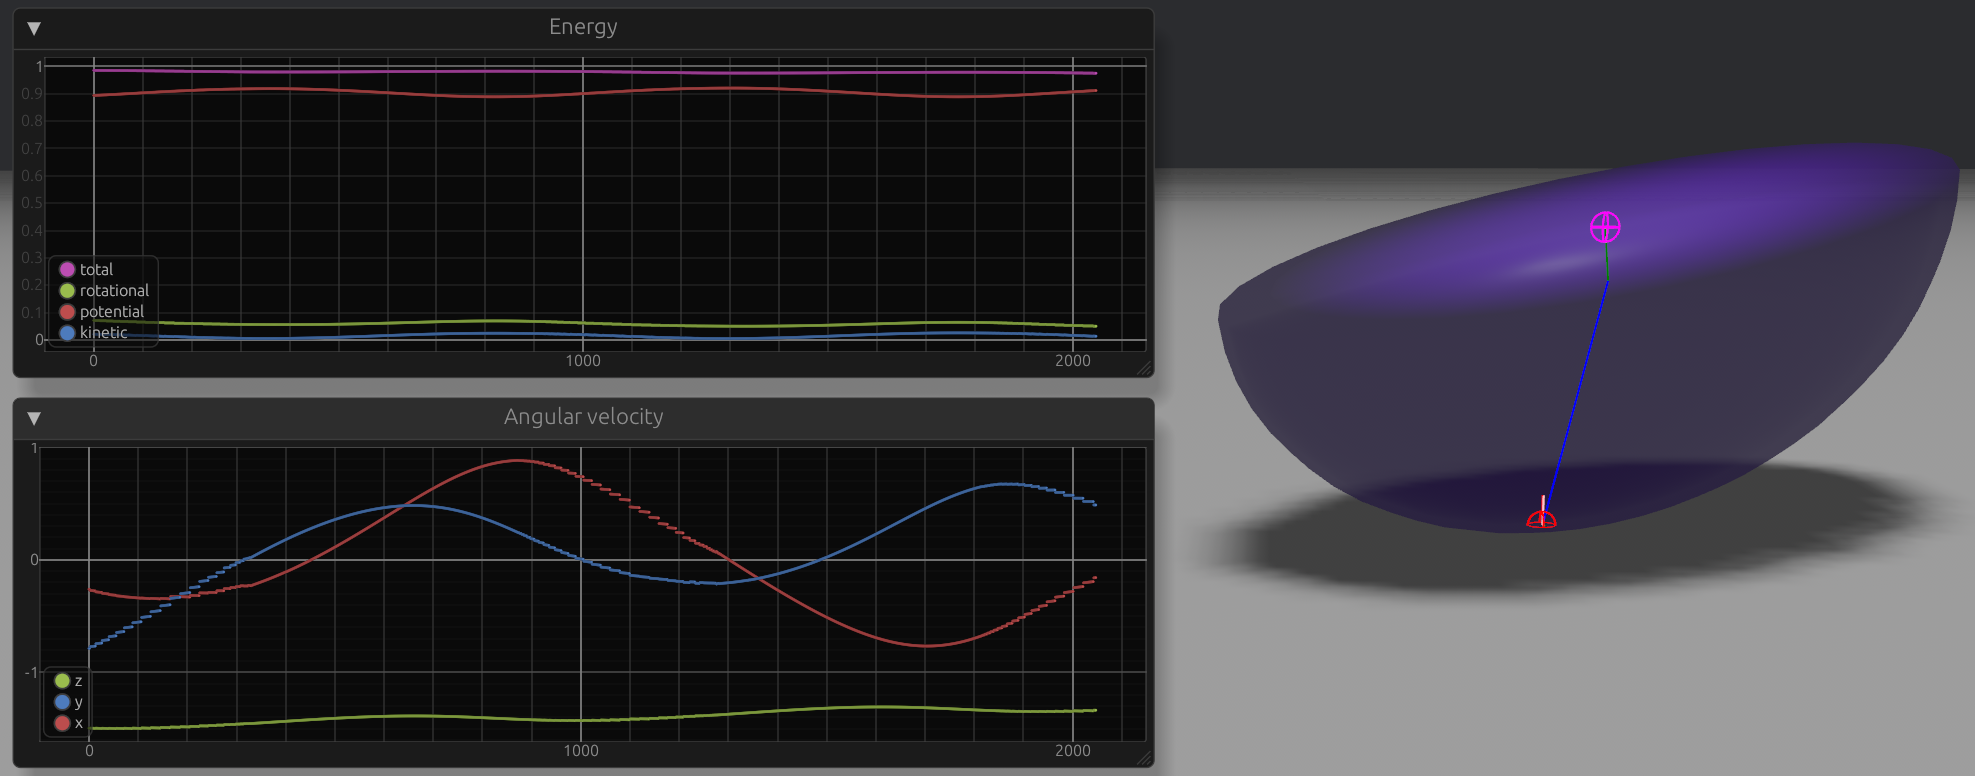
Tippe Top (check out the Wikipedia article and its video:
For more details about the simulations, wait until I publish my master's thesis 😉
Migrations
Bevy is still under heavy development and there is a new release every 3 months. This is awesome because you get new features like the mentioned system stepping. But new versions also have some breaking changes.
Fortunately, these changes are very well documented in Bevy's migration guides. But not only you need to migrate. You need to wait for all your dependencies to also migrate. So I recommend to keep the amount of used dependencies at a minimum and wait at least a week before trying to migrate.
This situation has been improved in the latest release of 0.14 because a release candidate was published before the actual release so that developers of plugins had some time to prepare a release ✨
Conclusion
Is Bevy ready for production? No. Bevy itself is transparent about this. Here is a quote from its official website:
Bevy is still in the early stages of development. Important features are missing. Documentation is sparse. A new version of Bevy containing breaking changes to the API is released approximately once every 3 months. We provide migration guides, but we can't guarantee migrations will always be easy. Use only if you are willing to work in this environment.
If you are currently trying to pick an engine for your Next Big Project™, we recommend that you check out Godot Engine. It is currently much more feature-complete and stable. And it is also free, open-source, and scriptable with Rust!
But I think that Bevy is already a very good fit for small games and scientific/physics simulations! I really enjoy using it and feel very productive 🥰
Bevy has a bright future since the Bevy Foundation was created some months ago and there are paid developers like Alice Cecile working on it in addition to many enthusiastic open source contributors 🚀
Finally, unless you are willing to invest some months to get a deep understanding of how physics engines work, I recommend using Avian instead of writing your physics from scratch 😅